

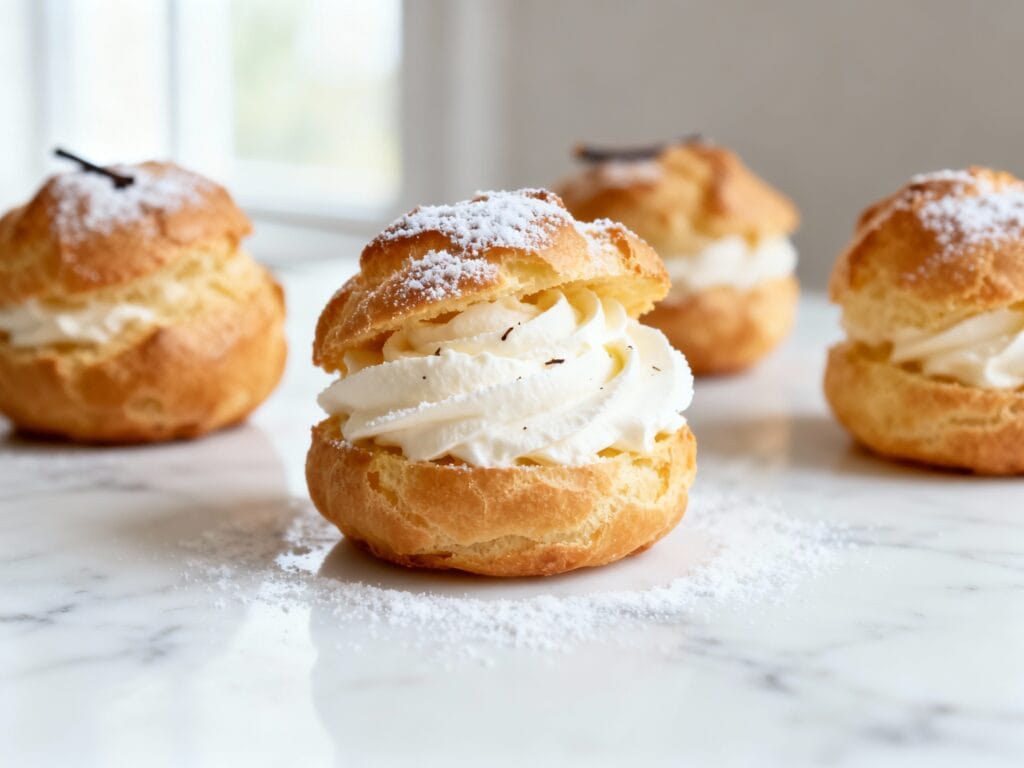
Cream Puffs Recipe with Stabilized Whipped Cream (Holds Up for Parties)
These cream puffs are the kind of dessert that makes people think you “totally bake all the time,” even if you made them in comfy socks while bingeing a show. Crisp, airy choux shells, filled with a fluffy vanilla whipped cream that actually stays put.
The secret is stabilized whipped cream: it holds its shape for parties, picnics, and “I’ll fill them later” situations without turning weepy. Make a batch, pile them on a platter, and watch them vanish.
Why You’ll Love This
You get bakery-style cream puffs with a filling that doesn’t deflate an hour after you pipe it—so you can make them ahead, transport them, and serve them without stress (or sad puddles of cream).
Ingredients
- For the choux pastry (shells): 1/2 cup (120 ml) water
- 1/2 cup (120 ml) whole milk
- 8 tbsp (113 g) unsalted butter, cut into pieces
- 1 tbsp granulated sugar
- 1/2 tsp fine salt
- 1 cup (125 g) all-purpose flour
- 4 large eggs, room temperature
- For the stabilized whipped cream: 1 tsp unflavored gelatin
- 1 tbsp cold water
- 1 1/2 cups (360 ml) cold heavy cream
- 1/3 cup (40 g) powdered sugar
- 1 1/2 tsp vanilla extract
- Optional finish: powdered sugar for dusting, or melted chocolate for drizzling
How to Make It
- Prep. Preheat oven to 425°F (220°C). Line 2 baking sheets with parchment paper. (If you have a piping bag, grab it now—if not, a zip-top bag works.)
- Boil the base. In a medium saucepan, combine water, milk, butter, sugar, and salt. Bring to a full boil over medium-high heat, stirring so the butter melts evenly.
- Make the panade. Reduce heat to low. Add the flour all at once and stir vigorously with a wooden spoon or sturdy spatula until a smooth dough forms. Keep stirring 1–2 minutes until a thin film forms on the bottom of the pan and the dough looks slightly glossy.
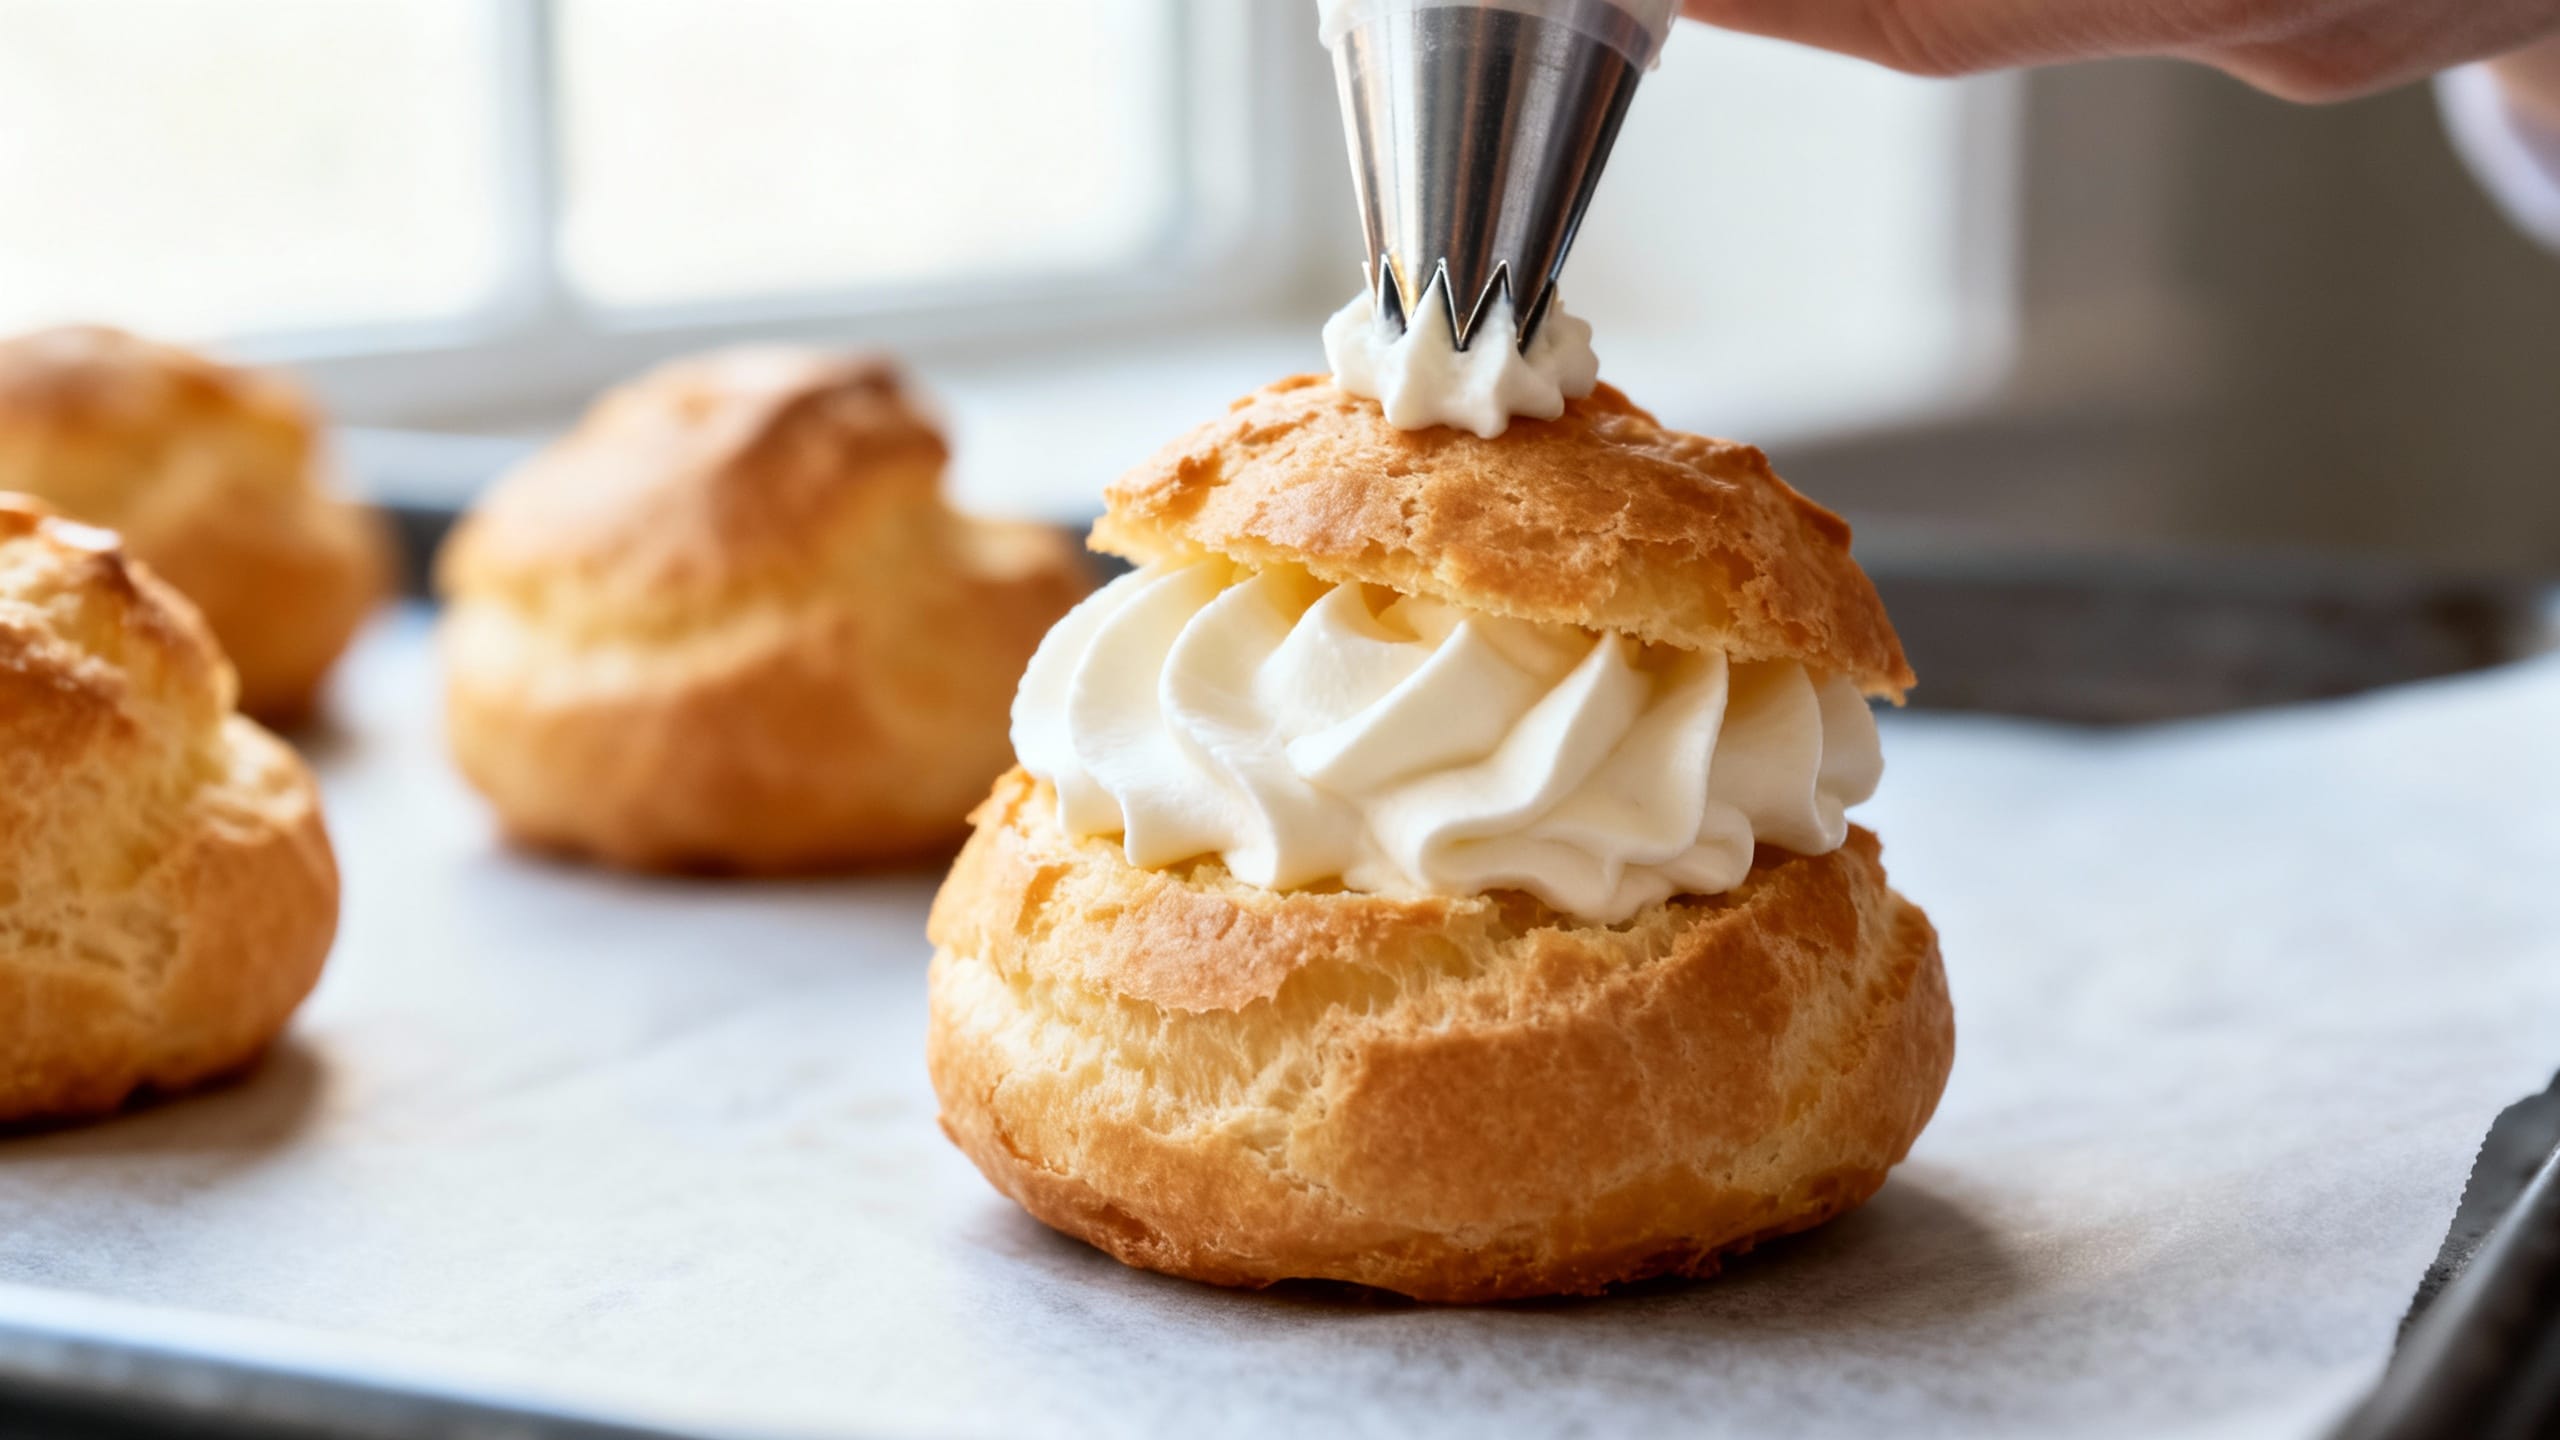
- Cool + add eggs. Transfer dough to a mixing bowl and let cool 5 minutes (so you don’t scramble the eggs). Add eggs one at a time, mixing well after each. The dough should end up smooth, thick, and pipeable; it should fall from the spatula in a “V” shape.
- Pipe and bake. Pipe 1 1/2-inch mounds (about 12–16) onto prepared sheets, spacing apart. Smooth any pointy tops with a lightly wet fingertip. Bake at 425°F for 10 minutes, then without opening the oven, reduce to 375°F (190°C) and bake 18–22 minutes more until deeply golden and crisp.
- Dry the shells. Turn off the oven. Crack the door open and let shells sit 10 minutes to dry. Move to a rack to cool completely. (Do not fill while warm—steam is the enemy of crisp.)
- Stabilize the cream. In a small bowl, sprinkle gelatin over cold water. Let bloom 5 minutes. Microwave 8–12 seconds until melted (warm, not hot). Let cool 2 minutes.
- Whip and fill. Whip heavy cream, powdered sugar, and vanilla to soft peaks. With mixer running on low, slowly drizzle in the cooled melted gelatin. Increase speed and whip to medium-stiff peaks. Slice shells in half or poke a hole and pipe filling inside. Dust with powdered sugar or drizzle with chocolate.
Tips for the Best Results
- Don’t open the oven early. Steam is what puffs them up; opening the door too soon can make them collapse.
- Go for deep golden. Pale shells = soft shells. You want them nicely browned so they stay crisp after cooling.
- Room-temp eggs help. They blend in faster and make smoother dough.
- Watch dough texture. If it’s too stiff, it won’t puff well. The “V” shape off a spatula is your best cue.
- Cool the gelatin slightly. If it’s hot, it can make tiny lumps; if it’s set, it won’t mix in. Warm and pourable is perfect.
- Fill close to serving for max crunch. Stabilized cream holds up, but the shells will soften over time once filled.
Variations
- Chocolate cream puffs: Add 2 tbsp cocoa powder to the flour (whisk together first). Or drizzle finished puffs with melted chocolate.
- Strawberries & cream: Fold 1/2 cup finely diced strawberries into the stabilized whipped cream right before filling.
- Lemon vibe: Add 1 tsp lemon zest to the whipped cream and swap vanilla for 1 tsp vanilla + 1/2 tsp lemon extract.
- Espresso: Dissolve 1 tsp instant espresso powder in 1 tsp hot water, cool, then whip into the cream.
- Mini party puffs: Pipe 1-inch mounds and start checking for doneness 5–7 minutes earlier.
Storage & Reheating
Unfilled shells keep at room temp in an airtight container for 1 day, or freeze for up to 2 months. To re-crisp, warm shells on a baking sheet at 300°F (150°C) for 5–8 minutes, then cool completely before filling. Filled cream puffs can be refrigerated for up to 24 hours; the stabilized whipped cream stays fluffy, but the shells will gradually soften.
FAQ
How far ahead can I make cream puffs for a party?
Bake the shells up to 1 day ahead (or freeze up to 2 months). For the best texture, fill them the day of your event—ideally within 2–6 hours of serving. The stabilized whipped cream will hold its shape in the fridge for about 24 hours.
Why did my cream puff shells collapse?
Usually it’s underbaking or opening the oven too early. Make sure the shells are deeply golden and feel light, and let them dry in the turned-off oven with the door cracked. Also cool completely before filling so trapped steam doesn’t soften them.
Can I make stabilized whipped cream without gelatin?
Yes. You can use 2–3 tbsp instant vanilla pudding mix or 2 tbsp powdered milk mixed into the powdered sugar as an alternative stabilizer. Gelatin is the most reliable for “holds up for parties” results, especially in warm rooms.
My choux dough is too runny—can I fix it?
If it’s runny, it usually has too much egg. It’s tough to fully fix, but you can try chilling the dough 15–20 minutes to firm it slightly, then pipe and bake. Next time, beat the last egg separately and add it gradually until you hit the thick “V” texture.
How do I fill cream puffs neatly without a piping bag?
Use a zip-top bag: spoon in the whipped cream, press out air, and snip off a corner. For the cleanest fill, poke a small hole in the bottom of each puff and pipe until you feel it get heavy, or simply slice and sandwich like a little dessert bun.